
Let’s be honest. The paperwork part of travel is nobody’s favorite. It’s that last hurdle between you and the smell of Thai street food, the warmth of that island sun, the chaos and charm of Bangkok. For years, the Thailand Arrival Card was a flimsy piece of paper you fumbled for on the plane, pen leaking, scrambling for your flight number. But times have changed. Enter the Thailand Digital Arrival Card—a modern solution that, when understood, can make your entry smoother, faster, and start your budget trip on the right foot.
As someone who’s stood in those long immigration lines after a 14-hour flight, I’m here to decode this digital shift for you. This isn’t just a bureaucratic update; it’s a tool for the savvy traveler. Used correctly, it can save you precious time (and time is money on a short trip) and avoid unnecessary stress. Let’s break it down, human to human.
What Exactly Is the Thailand Digital Arrival Card?
First, let’s clear up the jargon. You might see it called the Thailand Digital Arrival Card, the Thailand E-Arrival Card, or the TM6 Digital Form. They all refer to the same thing: the online, pre-arrival registration that replaces the old paper TM6 card.
Think of it as a digital hello to Thai immigration. You’re providing the same essential details—passport info, flight details, address in Thailand—but you’re doing it from the comfort of your couch, your hostel, or even your layover airport, as long as you have an internet connection.
Crucial Point: This is NOT a visa. It does not replace a tourist visa if you need one. It is simply the mandatory arrival/departure card for all foreign entrants, whether you’re visa-exempt, arriving with a visa-on-arrival, or holding a pre-issued visa. If you’re a tourist from most Western countries staying under 30 days (or 60 days with the new extension for some nationalities), you’re likely visa-exempt, and this digital card is your key step.
Why This is a Game-Changer for Budget Travelers
This is where the “Travel Decode” philosophy kicks in. Something as simple as a digital form can have ripple effects on your budget and experience.
-
The Time-Saving Advantage: Picture this. Two flights land simultaneously. One plane is filled with travelers who have their digital QR codes ready. The other is filled with people who need to fill out paper forms at crowded desks, borrowing pens, making errors. Who gets through immigration first? Who gets to the ATM, the SIM card vendor, and the first minibus to the city before the queues form? Who can maybe even catch an earlier, cheaper public ferry to the islands? You. The prepared traveler. Saving time at immigration directly translates to getting a head start on your first day, avoiding peak transport costs, and beating the crowds.
-
Eliminate Paperwork Panic: No more worrying about losing that tiny paper slip. Your digital approval is linked to your passport and stored on your phone. Losing a piece of paper that you must present when leaving the country was a classic, anxiety-inducing traveler’s nightmare. Gone.
-
Accuracy Means Less Hassle: Filling it out online allows you to double-check your hotel address, your flight number, and your passport expiration date. Errors on paper forms could cause delays at the counter. A smooth immigration process is priceless for your peace of mind.
Your Step-by-Step, Human-Friendly Guide to Filling It Out
The official portal is https://immigration.etravelthailand.com/. Beware of unofficial third-party sites that charge a fee! The government service is free. These copycat sites prey on new travelers’ confusion, often appearing as top ads in search engines. They might charge $20-$50 for a “service fee” for something you can do yourself in 10 minutes for free. This is your first budget travel test: find the official site.
Here’s the process, with pro-tips sprinkled in:
When to Apply: You can submit your application anytime within 30 days before your arrival date. Don’t leave it until the last minute. I recommend doing it 3-5 days before you fly. It gives you a buffer in case you need to correct anything, and it’s one major task checked off your list.
The Information You’ll Need:
-
Your passport (physical, in your hand).
-
Your flight itinerary (digital or paper).
-
The address of your first night’s accommodation. This is important.
The Form Walkthrough:
-
Create an Account: You’ll need an email. Use one you can access easily.
-
Add an Application: This is for you. You can add family members later under one application.
-
Passport Details Section: Type slowly. This is the most critical part. The system will auto-fill some fields from the passport photo scan, but ALWAYS double-check. A single digit error in your passport number can render your approval invalid.
-
Travel Details: Have your flight number ready. For “Vessel Name,” just re-enter your flight number. For the “Port of Embarkation,” this is the city your flight to Thailand directly departed from.
-
Address in Thailand: Here’s a common hiccup. You need a specific address. If you’re backpacking and haven’t booked your second night, that’s okay. But you must have a booking for your first night. A hostel, hotel, or even a paid Airbnb receipt will do. Have the exact name and address ready. If you’re truly winging it, book a refundable/cancelable hotel for this purpose. It’s a worth-it hack for the bureaucracy.
-
Review and Submit: Breathe, and check every field one last time.
What Happens Next?
After submission, you’ll get an email acknowledgment. Approval is usually quick—often within an hour, but it can take up to 24-72 hours. Once approved, you’ll get a QR code emailed to you.
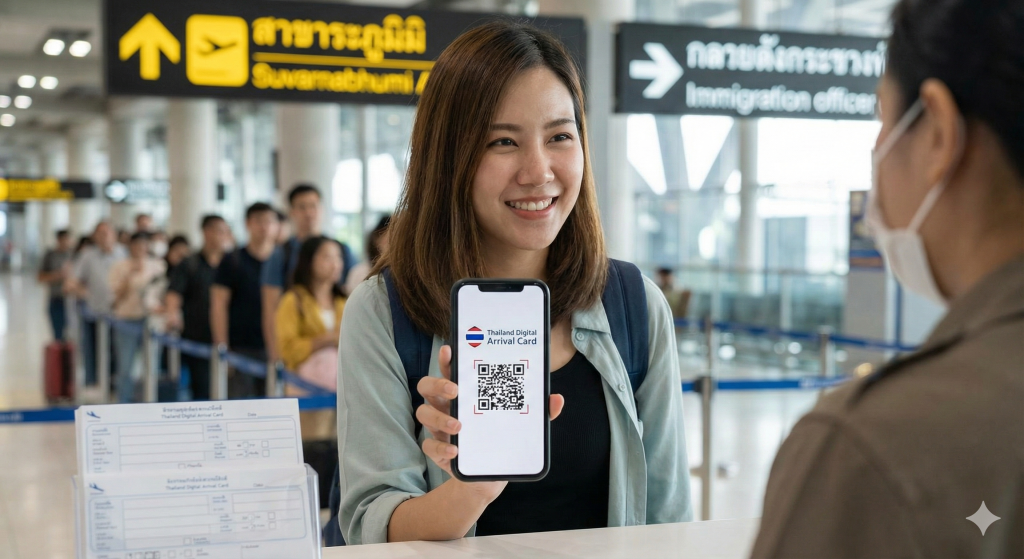
The Golden Rule: SCREENSHOT THAT QR CODE. Save it to your phone’s photos, add it to your favorites, and maybe even email it to yourself. Do not rely on having perfect internet access at Bangkok’s Suvarnabhumi (BKK) or Phuket (HKT) airport to pull up your email. Have that screenshot ready to go.
At Immigration: Your Moment of Truth
When you disembark, follow the signs to Immigration. You’ll likely see lines for “Visa on Arrival” and “All Passports.” If you are visa-exempt with your Digital Arrival Card approved, join the “All Passports” line.
When you approach the officer:
-
Hand over your physical passport (this is non-negotiable, the digital card does not replace your passport).
-
Have your QR code screenshot open and ready on your phone. They will likely ask to see it. They’ll scan it.
-
You may be asked for proof of onward travel (a flight out of Thailand within your allowed stay) and proof of funds (though this is rare for mainstream tourists). It’s always wise to have a digital copy of your onward flight confirmation handy.
-
Look at the camera for the photo. They’ll stamp your passport with your entry stamp. Check that stamp! Ensure the date is correct and that they’ve given you the correct number of days (usually 30 or 60, depending on your nationality and the current rules).
Troubleshooting & Pro-Tips for the Savvy Traveler
-
No Email/QR Code Received? First, check your spam folder. If it’s been over 72 hours, you can log back into the portal to check the status. If there’s a genuine problem, don’t panic. Airports still have paper TM6 forms available as a backup. Arrive a little earlier to fill one out manually.
-
Changing Your First Hotel? If you change your accommodation after submission, don’t stress. Immigration is highly unlikely to check. The address is primarily for administrative tracking. Just have the details of where you’re actually staying handy, just in case.
-
The Family/Group Trick: The portal allows you to add multiple family members (including children) under one application. This is a huge time-saver. Submit once for everyone.
-
Connectivity is Key: Do this while you have good Wi-Fi. Don’t try to do it on shaky airport or airplane Wi-Fi if you can avoid it.
-
Phone Number Field: If you don’t have a Thai SIM yet, put your home country mobile number with the country code. It’s fine.
The Bottom Line: Embrace the Digital, Enhance Your Journey
The Thailand Digital Arrival Card is a perfect example of how a little pre-trip digital legwork can translate into real-world ease and savings. It aligns perfectly with the smart travel ethos: be prepared, use official tools, and avoid the scams that target the unprepared.
By taking 10 minutes now to complete this, you’re buying yourself a smoother, faster entry into the Land of Smiles. You’re stepping off that plane not with a sense of bureaucratic dread, but with confidence. You’ll sail past the desks of scrambling passengers, QR code at the ready, and get your stamp with a smile. You’ll be on your way to that first glorious plate of pad thai or that first stunning beach sunset while others are still searching for a pen.
That’s the Travel Decode way. It’s not just about pinching pennies; it’s about investing your time and energy wisely to maximize the joy of the journey itself. Now, go get that QR code, and get ready for an amazing Thai adventure.
Safe travels,
The Travel Decode Team
P.S. Rules can change. While this guide is meticulously researched, always double-check the official Thailand Immigration website closer to your travel date for the absolute latest requirements. This is your final, non-negotiable pro-tip